18 December 2011

Mountains, in oils

When the assignment to paint a landscape or nature painting arrived, I thought at once of two places - Gotland and Scotland. Therefore, I duly painted both.
The first painting to be started on and finished, is an oil painting on a 38x46 cm (or F8) canvas on a frame. The reference photo was irresistible, providing me with challenges as well as speaking to some of my strengths.
I started out by sketching the outlines, managing reasonably well, and then began by painting the mountains roughly. I couldn't resist spending quite some time on them, before moving on to the grasses. A lot of raw umber and ochre colours were used. The sky was what I painted last, technically at least - I then went back and touched up both here and there, first and foremost in the area of the dark hills that actually had, as I noticed, a few flecks of sunlight in spots I hadn't hitherto noticed. And so it was out with the ochre again, and both working in almost-dried paint, and drybrushing.
I allowed this painting to dry for a few days during one stage, and left it alone for short periods of time too. I do love working wet in wet, but it needed to be left to dry for some details.
I am very pleased with the snow on the mountains, but it was very tricky to get the snow amongst the grass quite right. The photo doesn't do the painting justice, even if it does manage to catche some of the suble colour change in the sky, for example.

The reference photo is of the mountains of An Teallach (meaning, most likely, "Forge" or perhaps "Anvil" in Scots Gaelic), in Dundonell, in Scotland. They are very beautiful.

But this painting does not end there, I'm afraid. As I painted, I knew I wanted to incorporate something of a slightly more fantasy nature, and indeed, it would have felt unfinished had I neglected to do so. So there, in the left side of the painting, there is a someone and a horse, walking along.
Therefore, the painting is called what it is called - "Ered Luin, or An Teallach with a visitor." For what would that pointy-hatted old man do there, in Scotland? Not that I'd mind meeting him, of course.
The Ered Luin are also known as the Blue Mountains, and once stood east of Beleriand, though where that lay is now only the sea. Instead, we must look to the east of the Ered Luin, and notice, perhaps, the river Lhûin which flows into the sea at the Grey Havens, Mithlond.

"Even as the first shadows were felt in the Mirkwood there appeared in the west of Middle-Earth the Istari, whom Men called the Wizards. None knew at that time whence they came, save Círdan of the Havens, and only to Elrond and to Galadriel did he reveal that they came over the Sea." ("The Silmarillion", J.R.R. Tolkien, p 359)

And so, the parallell was an easy one to draw upon. But most of all, I am plain happy with a very good nature painting, which conveys some of the incredible beauty of a land I love.

20 November 2011

An oil painting long in the making

This oil painting was long in the making because of that which so often happens - life. It was near finished when something interrupted, and then had to wait for two weeks until I could give it the last few hours it needed. It might have taken anything between fifteen to twenty hours to paint, I am not certain.
For the background, I chose a photo of the Grampian mountains in Aberdeenshire, with a view that, on a clear day, allows you to see as far as out to sea. I thank Yiling Wang, my friend on that particular roadtrip, for her help in taking that photo. From it I used the background colours and the general proportions of the lady, but not the lady herself. She is from my imagination only.
I especially liked painting the dress, and the lower part thereof. I am not entirely happy with the area around her bust, but I had been working on it for too long, and decided I needed to let it be and work on something else. The hair, also, was a joy to paint. I have never tried making hair quite as detailed with oils.

In conclusion, I am happy with the painting and I think it shows that I have progressed in my painting, when I compare it to other paintings. There is still a long way to go to make it as photorealistic as I would like it, but that is what practice is for. I am, however, not entirely happy with the picture you see here - I had to opt for a somewhat reddish-grey tint to the originally white sky, in order for the photo to better reflect the true colour of the dress and the stone wall. I suppose I shall learn how to fix that in Photoshop, but for now, it is not too important.

The painting is called "Grampian Sidhe", after the mountain itself, and after the Gaelic word for Fair Folk (please note that this is what she is - not a fairy, the diminutive), or elf.

What do you like the best with the painting? What do you think could have been done even better?

23 October 2011

Two possibly surrealist paintings

The assignment to which these paintings belong was one where we had the choice of four styles: Abstract art, Surrealism, Expressionism and Cubism. Regarding these, I'm only friends with Surrealism, but I tried again my hand at Expressionism. It did, of course, fail, being labelled by my teacher as Surrealism anyway.
The picture to the left is not taken in ideal lighting conditions, and I doubt I'll take another. It was an attempt at Expressionism, and I care not much for it. For certain, it does say a little of what I wanted to express with it - spiralling emotions, hence the name of it. Especially the spiral in the hand, holding your feelings in your hand open for all to see, but ready to be squashed. It is made from acrylics, didn't take too long, and was painted on a rather small canvas.
The other, however, is another story entirely, and one I am very proud of.
It is decidedly Surrealist, and incorporates many things of which I am particularily proud or fond. The stylised bird, the sign for the shapechanging ravens, the Corax, from an old roleplaying game called "Werewolf: the Apocalypse". The lady in her Victorian/Edwardian dress and her rose parasol, with no face. The phoenix sun, which was a stroke of genius in my own mind. The blue to the left of the sky, the yellow below the bridge. The rocks, that actually look quite nice, and the strange, rolling clouds, or sea, or grass, below. The bridge, I might come back to and add a few little shadow touches on.
It is painted in oil colours, took remarkably short time from what I was expecting (that's not to say it was done in an afternoon, however) and it was a joy making it. The smoothness of the lower part of the painting took quite some time and effort, yet I did not overwork it, which was nice. I had to go back and touch up some of the white after I thought I was done and had taken some photos, because I had been sloppy with the brush in the white areas up by the phoenix sun.
It is dreamlike, joyful and a little bit disturbing. The way I like to paint Surrealism.

To see the pictures not in that automated "black background" mode, just hold your mouse button pressed and drag them to the address field, and they will appear in your browser all by themselves instead.

03 October 2011

Oil painting inspired by Mongolia

The last two weeks have seen a flurry of activity from the students in the course regarding Asia. Everyone chose a country to specialise in, and for me, the choice stood between Japan and Mongolia. The latter was my final choice, but despite the two seemingly ample weeks of time, I struggled to meet the deadline. There was simply so very much to write about regarding the art history of that country. The archaeologist in me couldn't skim by the rock art and petroglyphs, nor the way the various religions had influenced artists.
In the end, for my painting this time, I chose not to be influenced by any particular art style of Mongolia, but rather by the country itself. From two photos I mixed up something of my own, and I am happy that the idea I had, and the painting itself, added up. I used oils, which was a relief after time and time again being forced to use acrylics. Nothing bad with acrylics, but I haven't had time or space or peace to give a painting my attention in the same way an oil painting requires. This time, however, I did.
I didn't go haywire with the paints this time either. Mostly I kept to Yellow Ochre, Paine's Grey, Sap Green and Caput Mortuum (reddish brown), as well as Mixed White. There are several others in there, but those were the ones I used the most. I have no qualms about using the white, I need it to dim the colour. The size of the painting was about right (F8), I wouldn't have minded a somewhat larger one, but this did the job.
Painting older people is one of the most fun things one can have. All the lines of the face are a joy to discover and portray. The title, "The Secret History of a Mongol" is of course a hint to "The Secret History of the Mongols", the oldest known written description of the history of Mongolia, and Chingghis Khan, but also to the old woman with her old eyes, a lifetime of experiences behind her, gazing out at the steppes of Mongolia.

19 September 2011

Sheep after inspiration by Gamnqoa Kukama

The latest assignment was tied in with the theme of the art of Africa. I chose for specialisation the country Botswana, not the least because of their twenty thousand or more year of art history. The largest of these sites in Botswana is Tsodilo, but, I finally chose for inspiration for my painting the art of Gamnqoa Kukama. He has said a wonderful thing:
“Art is a spiritual thing. You long for it when you are without it. It is pulling you to do it. You cannot leave it.”

And also, his art has something in it that draws my eye. It may be his background, which you ought to read up on. It is really quite interesting.


This, then, was painted in acrylics, after the same inspiration as mr Kukama uses - from my childhood, the animals I knew, the plants I saw. I tried to draw upon his style of art when painting it, disregarding perspective in favour of feeling, using the idea of grass tufts rather than the photographic view of them and so on. I tried to keep a somewhat limited colour palette, with Process Cyan, Yellow Ochre, Titanium White, Process Black and a tiny wee bit of Permanen Green Middle.

06 September 2011

Two pieces of "modern art"

To me, a lot of what is labelled modern art is utterly without interest. I am annoyed by tagging and graffiti that serves no purpose but to seemingly try to make the world acknowledge that "I am here, hey, look at me!", abstract art sometimes makes me feel nauseous and I am seldom to never caught by pop-art, op-art and so on and so forth. The assignment, thus, to make two paintings in whatever two styles of modern art that I chose myself, was initially a source of some frustration. But creativity kicked in, and the results were fairly satisfactory. Not much more, but still. My nickname being Ellie, and me sometimes nodding in appreciation at the very best street artists and graffiti pictures (there are a few, I could probably count them on one hand), I thought I'd do something so artsy as to bring "ugly" art, street art, rebellion art, to the respected canvas. Therefore I spent an afternoon putting this idea into practice, and the result can be seen here. I tried my best to think of some of the features of a graffitied name - how do they use colours, what makes the name stand out yet being readable, and so on and so forth.I used Process Yellow, Process Cyan and Windsor Blue. Apart from this, only Titanium White and Process Black were used. The black was spiked with some Crimson, to make it stand out even more, and I added it very conscious of the effect it would have on the painting. The highlights were a tricky part, but the last spots of yellow a thing of improvisation that turned out well. So, it is not as garish and eye-catching as most graffiti, but rather, done the way I would do it. I am fairly happy with it.

The next picture is a digital photo manipulation. Because there is so much digital art these days, and, much of it really is true art in my opinion, I wanted to try and see, could I perhaps do something of the kind? Having no illusions of my skills with Photoshop, I began with a picture of me in costume from a larp - as Dream of the Fair Folk. There used to be a tree trunk in the background, which was when I learned to love the Clone tool (which clones one area onto another).I added the light magic effect thing, and then I used filters to make it look less like a photograph. It was a bit more work than that, but, that was the main process. It taught me a lot about photo manipulation, and some about what a vast array of tools are available for digital artists; also, some of what is required for expertise in the area. Regardless, I am fairly happy with the result, and it was well received by the teacher.

30 August 2011

Learning by mistake

The first assignment of the autumn semester was to paint a portrait of oneself from one's childhood, and a memory. For various reasons I had no reference material available, and so had to revert to memory and vagueness. I started out painting on a canvas of fairly small size, but painted for too long in the evening - the light changed, I made a colour-mix and then, the morning after, saw my mistake. Covering it up only made everything worse and so, I faced an uncommon occurence to me: I had to start over from the very beginning.
So I did. With deadline mere hours away (I believe, eight or six hours, maybe less) On a rather larger canvas of size F4, I suspect, I worked with the original idea, but simplified it. There is me, reading a book - as I did all the time, whether I was standing, sitting or even walking - but it is all made with a muted, Raw Umber mixed with Titanium White, colour, and sketchy at that. I did fill it in with a bit of colour, but only a little. The book is a little more detailed, but the interesting part are the surroundings. As I seemed to live most of the time inside my own head, or in my books, and the books and my fantasies were all much more colourful and enticing than real life, I painted some fantastical and mythical beings and things around the head of the girl. A lady with a sword, a dragon, some fairy lights or possibly butterflies, a moon, a stylised star. My art teacher labelled it "Symbolist" though I hesitate to place myself amongst the distinguished painters of the age when that label first appeared.

I certainly am not calling this a good painting, in any way but the idea that started it. It is hastily made, the colours aren't very well matched, the composition of it is decent but not perfect and over all, yes, it certainly shows that the artist, that is, me, was working under the pressure of a severe time limit. I simply didn't have the time to even lay the groundwork for making it better at a later time. I had to have a painting ready and so that was the only goal.
No, it's not a very good painting, but it was a learning experience nevertheless and the subject is one I plan on re-using at a later date.

13 June 2011

Pictures from my application

In a small flash of inspiration, today I would like to bring to you the pictures I chose to use for my application to the course! I am proud of all four of them, despite some being not the best in pure technical terms. Making some sort of transition of one of my drawings to the computer screen is as always very nearly impossible - scanners and I have never been on speaking terms, I don't know why, and taking a photo never really conveys the full amount of detail. At least, not with the camera I've got!
So here we go. The first picture is an old one; in fact, it was drawn in 2008, I think, in springtime. As so often, my linework with the pencil is thin and delicate. I drew this mostly with a... I believe it is called a "propelling pencil"? The hardness was HB. The pictures shows one of my own dreamed-up fantasy creatures, bark-skinned and twig-haired, talking to an elf in a pair of old jeans. There's a tiny owl and a small fox hidden away, though they do steal some of the viewer's attention; and also some kind of fairy lights. This one took a while to draw, and I worked on it in several sittings. It is a pity all the detail disappears in the transition to photo.
Next, we have another one of my portraits! This being the probably third or fourth that I ever dared show. Unfortunately the angle makes it look a bit odd but oh well. As you can see, my trusty Stabilo Woody crayon has done its work well here. Portrayed is a friend, Johan. The picture is very yellow, but I assure you the paper is white in real life. I originally had some trouble with his beard and some of the lines around his mouth, but then I asked him to smile, and suddenly I could see a lot better, where they were. The crayon is a somewhat blunt instrument, but it certainly covers a lot and is quicker and more efficient than, say, pencils.
Third is a finished watercolour of a meeting on a frozen lake. This was a Yule gift for a friend. I used photo reference for the nature, but freehanded the fox and the skiing little fellow that he is so curious about. I used watercolours, working mostly wet-on-dry, and finished with some white acrylics or gouache. It took an unknown amount of hours, but I remember being surprised at its taking such a relatively short time.
Fourth is a piece that is rather special to me. It is a work in progress, but I am proud of it regardless. With the help of some photo reference for the wood itself, the rest has been painted as I saw fit. A dancing Lady of the Forest, a flute-playing Lord, stick-and-twig-men, little foxes (there can never be too many foxes) and even a more current-day take on fairies. This was a real joy to paint, and a relief as well. I learned a lot about the medium itself, even while painting, and how I wished to use it. Some cue and inspiration I took from Charles Vess, and also a few tips on technique, that were most useful. In this picture it is evident some of my own personal "main points of interest" in art are, I would say. I hope to revisit this during this summer, to try and finish it. Also, I have learned a lot of colour theory which will hopefully help me avoid some of the pitfalls I was well underway of making with this one.

I hope you have enjoyed this little indulgence! For now, the main art course is over, but I shall continue painting through the summer and, hopefully, have something to show you all every now and then.

01 June 2011

Two portraits painted with directions

Again, this assignment was about painting in Expressionist style, two portraits. I believe that I failed that particular part of it. It simply does not come naturally to me. Part of the assignment was also to paint on 50x60 cm pieces, for which I purchased one canvas board and one canvas on frame.
The first photo here is of the painting that I made second. It is painted on canvas and I started out with a photo (of myself, taken on top of Dunadd Hill Fort) as reference, to get the general outlines of the face. I chose this particular one because the face is very tricky to get right in that angle. A mixture of black, blue, brown and some green and white was used for the outlines, and then there was a lot of blending and painting with larger, flat brushes, going on. I had immense help from the fact that my white is fairly opaque and could be used to "erase" areas where I made mistakes. There's a bit of a risk for that mouth to look like it is sneering, but again I take comfort in art being not finished merely because the artist puts the brush down - the viewer has part in it as well. I did not mean it to be sneering, I meant it to be sad, but there you go.
The second photo is the painting I painted first, and on a canvas board. Again, a photo (where Jonas is actually wearing a similar shirt) was used for reference, and I focused on the eyes, mostly. I am not very happy with either of these paintings, but they were good exercise. The shirt I am satisfied with, however; it looks good without being overworked. I started out in the same way as with the second painting, but had to make a lot more corrections. I could not get the measurements right, and it does seem to me now that I have a problem with drawing portraits and that it lies in the forehead-eye-nose-mouth and getting the same scale for all of them. This painting took two days to finish, but in hours as well, it was my so far most time-consuming piece.
I guess I am not happy because they do not look exactly like their subjects. Close enough but not exactly. Which is why I ought to redo this assignment, so that I push my own boundaries and learn something new.
All in all, I would not call either of them "Expressionistic", but they do express something at least.

23 May 2011

An Expressionist Dunstaffnage Castle

For my second painting in the Expressionist style, I looked at the artist Gabriele Münter, and noticed how many of her paintings are of houses on hills, and the like. I thought of a picture I took maybe half an hour before the photo reference I used in the last picture, one of Dunstaffnage Castle itself. It was autumn when I visited the place with my friend, but as it turned out, that didn't have a strong enough impression on me when I chose to paint it, and so, it doesn't look much like any season at all. Maybe like early autumn.
An important point about Expressionist painting is that it's not a painting of the artists impression, but one of their own expression. Their inner feelings and emotions about the scene before them, rather than their impression of it.
I always liked castles and ruins, and their diversity fascinate me. I am also an archaeologist, and I had my reasons for wanting to become that. Castles and ruins give different impressions - some are sad, mournful, even desperate and I'd like nothing more than to restore them to their original glory. Some seem not to give the slightest bit of care to the fact that they are crumbling, and stand proud and intimidating still.

Dunstaffnage struck me as a bit of both, but mostly as a very impressive castle built well and with good defensive strategy. I painted this on a fairly large canvas, F8 in size, with acrylics. It took a few sittings and several hours. I had the fortune of having good natural light as well as a lamp, though after painting in the evening, I went back and re-did the grass because it looked too garishly yellow-green. The sky had bit of a touch-up as well. The odd yellow blob to the right side was a tree with autumn leaves. Oddly enough, without meaning to, it gives something of a depth to the painting.
There was also something mystical about the castle, about its strong walls and odd angles, and what with everything we found around it, and how magical the entire journey was, I couldn't resist painting something in that picture that's usually relegated firmly to outside the fine art galleries. The clue is in the name of the painting, "Clouds over Dunstaffnage Castle".

This was the first painting since the course began that I gave away. Feels odd not to have it at home, but it was a late birthday gift for the friend with whom I shared the trip.

13 May 2011

An attempt at Expressionism

I have, when let loose, a tendency to draw and paint with lots of tiny details and small areas of paint. This course has been a real good thing for me as it forces me to paint differently. During five weeks (or somesuch) our assignment is to write about and paint in the Expressionist style. This is rather tricky - it's a very much-encompassing title, but in short it is about expressing feelings. Subjective feelings rather than objectively painting reality, and moving away from exact, naturalistic portrayal of things in favour of emotions and the artist's own expression.
Part of this particular assignment was to paint on a 50x60 (or F12) size canvas. When I saw in reality the size of it, I realised, wide-eyed, that this would really be something else for me. It was, I must admit, a complete and utter joy to paint! I chose, after a long thought, a photograph taken on my journey around Scotland last autumn, north of Oban, by Dunstaffnage Castle, looking out across to Isle of Mull, I think. There was something about how I felt when the photo was taken, and how I feel looking at it, that I tried to get across. I also bought a very large paintbrush - possibly size 24 or somesuch - to help with the really large areas. I looked long and hard at a few Expressionist paintings, such as those of Gabriele Münter, and then set to work.
I used acrylics, and it took at least four hours. I didn't time it. The first picture is the finished painting, the second is what it looked like after I painted the outlines with black paint, and then started colouring some of the larger areas. I tend to go for large areas first, something I picked up while painting miniatures. This time, I really wish I could show the painting to you in real life, because the photo doesn't do it justice - size wise, colour wise and so on.
In conclusion, I am very, very proud of my achievement this time. If it pleases you, feel welcome to comment, and also about the feeling it evokes inside you, if you wish!

02 May 2011

Two more free assignments

Free in the sense that we were given a week to paint one or preferably two pictures, after our own design, ideas and style, as well as medium. I would have dearly loved to be able to sit every day and have another wonderful go at using oils, but alas, there was no time.
Here then, we have the two pictures I chose to make. One which, admittedly, I started on a bit earlier, after an idea came together in my head. The character is one of my own design; an eccentric noblewoman by the name of sir Vincent Ravenscroft (let's keep the gender-, sex- and so on, discussions, somewhere else, shall we - it is a female, she's happy about being a female, and she prefers to be called "her" and "sir" and dress in men's clothes), who is a hopeless romantic, a charming charmer and socialite, artistic, intellectual dandy. Here, we see a daring escape by a small airship - from the lady? From the man? After kissing the lady, thus upsetting her fiancé - or perhaps, after kissing the man, upsetting a lady romantically interested in him? In whichever case, there's of course a marvellous tale behind it all...
Well, you get the idea.
I worked in acrylics, on an F4 paper block again, starting out with a sketch and then painting from big areas and going into details later. The sky was originally going to be a darkening blue, but it didn't look quite right once I'd painted it, and painting it all in evening colours would have been weeks and weeks of work, if I had been able to pull it off at all. So it had to be by daylight, though I dare say one day I will paint another one, somewhat similar, to it, "by night" so to speak. I had the most trouble with the far background - the pink house and the forest, or park, or whatever it is. I chose to make sir Vincent herself the most detailed part of the painting, as she is the main subject. Overall, I'm not entirely happy with the picture. There is something about it that nags me to sit down and spend some more time on it. But some things I think I did well, even just keeping them very simple. A lot is killed off in transferring it to photo and screen, though not as much as with the next picture. In the end, I also had to revert to a few ready-blended colours from my dear Games Workshop box. They're acrylics of a sort, too, and they had just the shade I needed. I need some more paints for my acrylics collection, I lack a few shades that are simply necessary for painting properly - some kind of better blue, amongst others.
This one is a lot less complicated. It was a real relief painting it. I chose a theme of the season - cherry blossoms, or, as it is in Japanese, sakura さくら 桜. (In English and Swedish, the words are "cherry/körsbär" and "cherry blossoms/körsbärsblommor", implying that the fruit is the main association. In Japanese, however, it is the other way around - sakura, versus sakuranbo "cherries"). It was an easy thing finding a few pictures for inspiration and briefest reference, before the delightful act of blending a simple pink of just the right shade, and an almost-black. The branch I painted first, then, the sakura, and last the pale blue. It's a great pity, really, how much is lost in the photo. It was a simple painting, took very little time compared to the other one (not a hard thing to do, admittedly) and was a delight to throw together. Also, it was interesting to have a lot of unpainted white.

24 April 2011

An attempt at Fauvism

The latest school assignment presented quite a challenge. Apart from the studying, we were supposed to paint in Fauvist style. Reading about the movement itself, it is hard to find much about how the artists painted, other than that they wanted to experiment with colours. I did my best to study different paintings, and artists, but at first, the only common denomination seemed to be strong colours, often slightly skewed, or a lot of orange and yellow and red. Eventually I figured I had to try and paint anyway. With the latter half of Jim Dale's reading of "Harry Potter and the Order of the Phoenix", I set about looking at a great number of paintings, and then to paint. I decided on the fairly, for me, unusual, and also interesting, subject of a prancing horse.
I began by sketching, with blue-black acrylics, the horse, and then simply set about painting. It was done on the paper block I purchased before, and with rounded brushes, mostly; also some was done with the feather brush I am now eagerly trying out at every opportunity, and the two small round brushes I use. It took me but one sitting to paint it, with a few pauses.
Perhaps I should have been using clearer paints, but after a few layers, and a lot of concentration and some more looking at other paintings, I think I figured out most of it. Exaggerated colours and clearly delineated areas seemed to do the trick, and at a distance it really looks good. So despite its shortcomings, I feel I managed to do the assignment mostly justice.

I feel proud that at least I, myself, can see my skills improving! I look forward to the next challenge.

31 March 2011

Sunflower or blue iris

Out of the titular two, I chose the blue iris. I want the painting process to be filled with joy and satisfaction, and trying to paint a sunflower didn't catch my fancy. Also, there is something about them that can have me stare and look and think and ponder for hours. And yet another thing; I went to the Imperial Garden in the Meiji jingu park in Tokyo in very, very early spring, and the pond there fills up with blue iris in the summer. I've always wanted to go back and see it.

Said and done, then. I found myself a reference (despite having quitely resolved to try and NOT use reference for once, but it was a good thing I did), and set out to paint. I chose a real canvas this time, which felt exhilarating and exciting, although I felt silly feeling that - but there really is a difference between painting on a canvas board and a proper, stretched onto a frame, canvas. I started out drawing the outlines, of the flower and the leaves around it, with an HB pencil again. It was fairly straightforward.
When I started painting, I originally went with too much pink in the blend, so it turned out a wee bit too purple. I used this to good effect, however, on some areas of the flower, as they really were a lot more purple than blue. Mostly, I used Prussian Blu, but also Ultramarine Blue. I added a bit of Cadmium Red, and in fact also a pinkish red whose name escapes me - possibly Alizarin Crimson? For the yellow I looked no further than my Cadmium Yellow, which was also a key ingredient for the green.
The colours in the painting tied in really well. The blue in the iris, with a dash of red, and then the near-purple of the spots. The pure yellow didn't feel out of place because of my simply blending it and the blues I used, for the green in the background (well, I did cheat a bit here, I think I used some Viridian or Sap Green too, but mostly I blended the greens myself). And the white goes a bit of everywhere, where it is needed.
And here it is. I think I captured the vibrancy of the colours fairly well with the camera this time, but it's going to be interesting to see it fully dry! Here, it's been drying for a week. I painted it in, well, several hours, but mostly during two days. Started in the middle of the night and went up early to continue. I couldn't resist it!
I think I could have taken a bit less of a look on the reference photo - it's a very good likeness, but I should have thought for myself, too, to make it look more "real". As it is, some areas of the flower look almost flat, though I know that in reality they aren't - of course. Again, I used a lot of blending. It's really one of my favourite ways of making things look smooth... Pity I'm not better at it, when it comes to watercolours! But I'll get to that in time, I suppose. In real life, the painting gets a bit of texture from my using a fairly thick layer just about everywhere, but it is especially apparent with the yellow areas. They do look a bit knobbly, just as they should. I mostly used flat brushes, and preferably with a bit longer hairs. I'm thinking of getting a "fan" or "feather" brush, since I think it'd be interesting to try and paint with.
Once again, I'm very happy with this, and I hope I'm have some nice spot on a wall to hang it!

23 March 2011

Colour-study of an apple

This art blog has been mercifully free of still lives, but this time I came pretty close. The assignment had to do with colour constancy and what we expect to see for a colour, and what colour is really there. I rolled up a paper into a small tube, and took it for a help while painting an apple.
Again, oil colours were used as a medium, with the help of some odourless paint cleaner and thinner-thingumajing. I worked on my favourite the F3 canvas board, and used a red apple on white-ish fabric for a subject.
The thing I found most tricky were the spots of highlight - they changed depending on light-source, of course, and looks very strong in the picture.

To my defence I'd like to say that I have since the photo was taken, gone over them a bit with a brush, so that they are now a lot less stark white and look much better. The real apple was moved from where I painted it, to where I took the photo, hence the differences in light and perspective and all. All in all it was a good excercise. It was particularily interesting to try and incorporate the shine caused by the bright cloth underneath, to work with uneven shadows, and to figure out how much blue versus yellow was needed for the not entirely pure red areas. But I've always had it easy with the yellow-to-red part of the colour spectrum, so it wasn't very hard to do this.
I might redo this, with an orange or something, and perhaps a blue cloth or something, just to give me a bit of a challenge (blue and orange being opposites on a colour wheel).
Pity, again, that the picture made the granulated canvas board look really odd, but oh well.

22 March 2011

From sketch to finished painting

I have a tendency to forget to stop and take pictures of in-progress paintings (and drawings). So being forced to do so was a very good excercise. I figured I would try and be inspired by the seasons, this time, and lo, few things so symbolise it to me as little baaah-lings, that is lambs, and their bleating. I was thinking of adding a small faery or something to the picture, but completely forgot in the joy of finding such a cute subject without much effort anyway. I used an F3 canvas board and oils, which I had been itching to do for quite some time. In fact, itching so much that you will see I made all three or four weeks' worth of assignments in almost one go (I think I finished them all in a week).
I found myself a nice reference picture (I was looking for one with black head and grey wool but found this delightful little fella) and set about it. First, sketching with an HB pencil (I find 2B smudges too much when painting over it on canvas and the like) the outlines of the little lamb, and also some of the shadows. In hindsight it would have been better to choose a more colourful picture, and one with more contrasts. Next time, next time.
Then, I brought out grandmothers charcoal and filled in the shadows, marking them properly. This, again, told me that another subject would have been better as charcoal does smudge something terrible and I was painting an awful lot of bright or pale colours. Regardless, filling in the shadowed parts a bit more is a good way of adjusting the eyes and mind to remember that here be shadows. (Another interesting thing to note is how the light changes throughout the pictures - I prefer to paint during daytime, to make use of natural light, but since the light itself changes and so do colour values throughout the day, until it becomes, even with lamps, too dark, it's not always without its faults or troubles). (It also makes it easier to get a proper representation of the colours when you photograph a painting, something which has made me gnash my teeth both once and twice. They look so great in real life, but transferring them to the screen is another matter).
I started out painting the main subject, the lamb itself. Mainly because it consisted of pale colours and a lot of white mixed in (but very few areas are actually completely white - one of the interesting things with white is that you have to paint other colours in order to make it look white, especially shadows), but also because I had a fair idea of how I was going to paint it, whereas with the grass I was uncertain as to how best go about it. As you can see, I began by working from the groundwork I had already done, filling in shadowed or more obviously coloured areas first, as well as covering with various shades of white. I am currently using a mixed-white oil colour, to get some kind of the best of both worlds. Titanium white really dries slowly, but it has a lovely shade of white.
Smoothing out some sharp lines, I then went on with the grass, trying to catch the general colour. All in all it became much too dark, so as you will see, I worked to lighten it up and also to try and get some of the blatant green-ness out of it.
Again, I worked in my seemingly usual way: Fill in the large areas, then add details. I've a hard time painting with any kind of pointillist technique, but maybe next time... Between the first and the second picture with the grass painted, I took a pause overnight. Once again the delight (and annoyance, more on that later) that is the fact that oils doesn't dry immediately, helped. I could pick up my brushes the next day and without problem use a technique I am very fond of; wet in wet, blending colours seamlessly. Then came a few hours of dabbing here and there to start giving it a bit more of texture (once again something oils excel at, though at times I find that certain artists use it carelessly and much too extensively, creating a muddy and clotted image), filling in shadows that I accidentally made too light, looking critically between painting and reference, looking up new audiobook chapters of "Harry Potter and the Order of the Phoenix" (I have to grit my teeth, I admit, to get through it - few times I have wanted so badly to do bad things to fictional characters but Umbridge, oh dear...), switching madly between brushes to get the right look for the grass and avoid using brushes with green colour on areas of white.
Colour constancy is an interesting subject, and suffice to say that a bit of reading and research on the matter helped immensely in making me realise that I needed a lot of brown in the green grass. Said and done, and suddenly everything got a lot better.
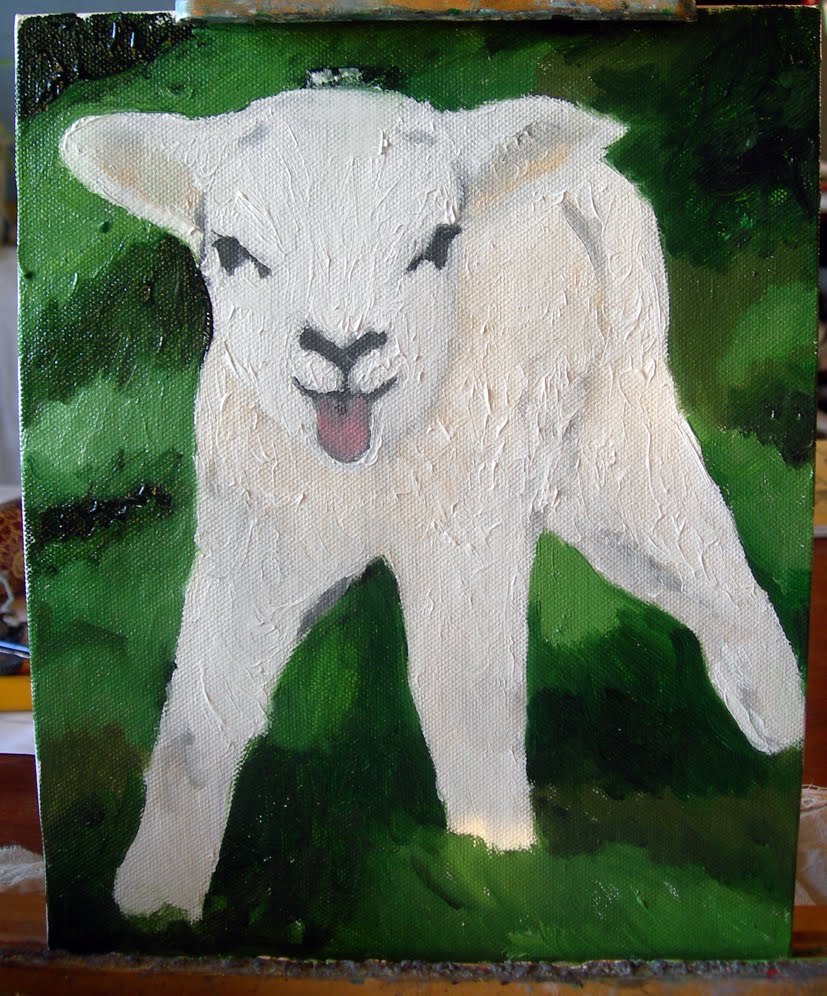
I used almost pure Ivory Black on the eyes and nose, I think I blended in a bit of brown though, and as you can see in some areas the nose is blended rather than monochromatically black beside white. And despite them not being there in the reference, there is a white dot in both eyes, to give them more life. Old painter's trick.
The difference between near-finished and final is, in some areas, almost startling. The tongue is a lot more lifelike, shadows and texture are suddenly visible, and I did in fact mellow the line between nubs of horns and hair on top of the lamb's head a bit, after the final picture was taken. Now it's lying on the top shelf of a cupboard just to try and keep it out of the way until it dries. Which will take several weeks. So, there we have the downside with oils not drying quickly - you have to keep them safe until they are dry, otherwise the paint will get everywhere and the painting will be ruined, and oil colour stains are rather tricky to get out of fabric and clothes.

All in all, I am very, very happy with this very cute picture of a bleating lamb. I look forward with putting this up on a wall, but I'll have to cover it with glass, or it'll be ruined from me trying to cuddle it. In real life it is cute as a button! So yes, once again I do myself proud. I'm again hesitant to call it impressionist, but I'll leave that to others to say if it is or isn't. Tell me and I'll happily revise the tags.
It took me more or less two full days to paint, and having smell-free brush-cleaner was vital. On a sidenote, I also use this to thin the paints, as I do with water and acrylics. I have had comments on me somehow managing to paint very thin colours, but I suppose it's part of my own expression, maybe?

09 March 2011

Two projects after my own ideas

The task was to paint two paintings; with subject and tools of your own choice. Still not having access to my oils, I went for acrylics again, and started out with a canvas board of the size F2. I had a vague idea for what I wanted to do, and it boiled down to what you can see on the right. I looked for a nice photo of a bus stop, and it had to be in Edinburgh. Eventually, I found one on the Lothian Buses website, I think, or somewhere similar, and it fit what I wanted to do. Originally I was going to have the girl stand up, leaning on the signpost, but that would have disturbed the picture rather than add to it. Having her sit down, and on a big old trunk, made it more coherent. You can still see the things that make the picture just that degree of odd: her satyr legs and horns. I used acrylics, and after my first bout with the picture I wasn't too happy with it. But then I came to an important realisation: I didn't NEED it to look perfect right away. I was going to come back to it and work on it again and again, and after many times and many hours, it would look better. That was a very important piece of insight.

I worked with flat brushes a lot for the larger areas, but then went over to smaller, round brushes, with rather long hairs. I found some incredibly cheap and sturdy little brushes at an art shop, that work perfectly well for how I treat them and use them. The trees to the right of Waverley Bridge (which connects Old Town and New Town in Edinburgh, and is the place where I first arrived to, by, incidentally, bus) were almost stippled, and I had a hard time at first finding the right balance between photo reference, suitability for the overall picture and what colours would actually look good. The puddles of water were something I fretted about, as I couldn't seem to do them justice, but they are done well enough, I suppose. I did try to make the painting tell a bit of a story, though you can't see her facial expression very well from the photo. Nor are the colours as nice as they are in real life but that is all right. That's a greater issue with my next picture than with this one. I call it "Waiting for the bus" by the way, and it's my first properly "urban fantasy" painting, I guess. Next time I decide to go for these tiny detials, however, it'll be a no-grain paper for me, or oils. I might also work on this more in the future, but we'll see. I started by sketching with pencils, and then work from larger areas to small detail.

Here we have the picture that came into my mind, and I couldn't wait to paint it. It's acrylics on a 24 by 32 cm paper from a Canson cold pressed, four side glued block for acrylics. I started out by grabbing a round, thin brush and a piece of Process Blue (cyan), to quickly sketch the outline of the bird. It's a phoenix, known as Fushichou 不死鳥 in Japanese (the signs mean respecitely "un-, non-", "death, dying" and "bird"), and it was lovely to go haywire with colours, and to make use of the great delight I take in painting fire and all variants of it. Fire, you see, needs some study to be able to paint it properly. Here, I have used both the "real" way that fire is built, and the "perceived" way. In the very inner core, some white that is almost blue, and then, darker as we go further away from the source of the flame. Yet it seems sometimes that it is the very outer parts that are the brightest, and indeed, in some cases, flame does go from bright, not as bright, dark and then brighter again, before the air takes over. The picture is life and motion, is rebirth and is a riot of colours. Once I had finished the bird itself, I knew I needed to bravely venture into the realms of background and so I did. With a bit of some blue-tinged green, I started out from black and then went head to toe with the fact that I'd painted real pretty wings... and that I'd have to try and keep the flamey aspects of them. Drybrush, an old friend of miniature painters worldwide, became part of the solution, and then I just added more and more green, and diluted it with water until the very core, which is pure Titanium White. Some parts are better blended than others but all in all it was a very good result, compared to expectations.

It is very difficult to capture this in a photo, but I went off to my figure case and brought out Games Workshop's Shining Gold and Burnished Gold. Adding a dash of these metallic paints to some parts gave the picture the finishing touch I wanted. It brings it to life in a whole different way. I think I missed going over the detail shot in Photoshop however, but oh well, there you go. I forgot to sign the pictures too, before I brought out the camera.
I also, incidentally, used the colour Red Gore from the GW range, as it is an old-time favourite anyway, and I simply didn't manage to get the right red, when I tried blending colours. Those colours come in small pots, and are acrylics too. In the very darkest recesses of its wings, I used black with some Red Gore in it, and the loose flames emanating from the wings are painted with Cadmium Yellow Lemon or somesuch over Process Yellow, with a dash of white in some.
I am very, very happy with this picture. I learned a lot from making it. The joyous expression in the phoenix's face, the swirly feeling of movement, the composition, the balance between colours and lines and details; yes, I can safely say I am very proud.

As per usual these days, I was listening to Harry Potter audiobooks while painting. For these two, I had reached "Harry Potter and the Goblet of Fire" which, to my immense happiness, proved to be as good as I remembered it - not as good as my favourites of the series, but so very much better than the poor movie. And Fawkes, Albus Dumbledore's phoenix, makes an appearance in it.

That will be enough rambling from me. I hope you enjoy these my latest projects, and I am also proud to say that I feel confident enough now to take on some kind of commissions. As of yet, payments for them are not standardised but will be dealt with on a case-to-case basis. I hope that what I have posted here so far shows some extent of my versatility. I enjoy painting thoroughly, whether it flows easy or presents me with tricksy obstacles.

21 February 2011

Emergency acrylics

The next assignment for the course was predictably enough to paint a picture in post-impressionist style. The problem was, by the time I knew it was supposed to be done in oils and before what date, I'd already left the particular place where I keep most of my stuff, including my oils. I had brought with me acrylics, though, as they are far easier to transport, and an F2 canvas board (I have a preference for canvas boards, as they take up less space and are cheaper). So I set out to at least try to do the assignment anyway.
Once again I found myself troubled by the choice of what to paint. I wanted something from real life, but that proved unfeasible, and taking something from off the top of my head didn't work. But recently, via the blog of Neil Gaiman, I found at Dr Sketchy a session that had been dedicated to The Endless, from the comic series "Sandman" (which, if you haven't read it, you ought to). I found this, and was taken with how awesome Desire came across.
I used said F2 canvas board, my synthetic acrylic brushes and my paints, to which I'd added one more yellow. I previously owned only a Process Yellow, but decided that a Windsor & Newton Cadmium Yellow Light would be a good addition - in hindsight, I should have gone for something darker but, there you go. I didn't sketch beforehand, but started with a dark brown, mixed from I can't remember which colours (orange and green, probably) to get the outlines of his/her coat. I did try, I really did, to paint with inspiration from Rysselberghe and Tolouse-Lautrec but as you can see... I pretty much failed. I tried using their brush technique, and their eye for colour but bugger it all, I failed. I'm not about to give up, however! I intend to have another try once I get a hold of my oils again. Post-impressionism isn't my favoured style but I want to force myself to paint in ways I never would otherwise, to progress my skills.

I painted this in two sittings, and did the majority of Desire in the first, but the background and touch-ups the next time. A good thing, since also the light changed in the room I worked in, so that some colours that seemed like good ideas the first sitting, weren't actually, as it turned out in full daylight.

I tried not to shy away from strong colours and sharp contrasts, and to paint with small brushstrokes and thick layers of paint.

16 February 2011

Drawings, with pencil and ink

The next assignment for the art course was drawing. Drawing with pencils, and drawing with something else - "experiment!" they encouraged us. So... I did. This is the medium I've been using the longest, and you can see the progress throughout the many varying drawing pads I've been using. But there are certain things that show it's an "Ellie". First out, a recent favourite of mine - drawing portraits! It's challenging and fun! The first I dared show anyone, I drew just earlier this winter. This, however,
is a portrait of Erik, reading the excellent book "Tigana" by Guy Gavriel Kay. It's made mainly with a 2B pencil, but 4B and 6B played important parts in making the darker parts, well, darker. Such as the hair. I used a stompf to good effect, too, but I think I might go back and revise a few parts. The stubble on the chin wouldn't look too bad being a bit darker. All in all, however, I'm happy with this. It took a good hour... two hours? I have no idea. I just go into mushin/munen-mode and come out afterwards. (That means, no-mind). I do admit I didn't care too much about the top of his shirt, or his necklace... To add too much detail would have drawn attention away from the main thing here. (That's as good an excuse as any!) I wish the light sources would have been a bit more interesting, as it was, I had a window from sort of behind-beside his head, and then a lamp from behind me. Would have liked one from above, to create more interesting shadows in the face, and show off the cheekbones a bit more. I did have to correct his head pose a few times; this is, I guess, one of the reasons why his lips and nose look a bit small and pointed, I didn't get the exact same angle every time I did.

For the next picture I figured I'd give myself a challenge, again. I set up a nice little still life, with a teacup, a character sheet from an RPG and some dice. And a pen.
And it turned out just as drab, boring and wonky as could probably be expected. So my eye caught a kimono on a hanger on a wall, and I figured... this could work. I started out drawing the first lines for it with my 2B pencil, and marking in some shadows. Next step was to pick up my Japanese calligraphy brush - not a proper brush, where I make the ink myself, unfortunately, but a ready-made one, with ink in the pen shaft. The brush was fairly dry, and I kept it that way, to have an easier time making softer shadows. There was no way I could properly capture the wonderful interwoven pattern in the dark-blue kimono fabric, but the obi decoration was far easier! I thoroughly liked working with the ink, and added a bit of my trusty, wonderful Stabilo Woody crayon/pencil. Mixing mediums is fun, even if it's not that apparent here. Also, I think that if I went completely to scale with things, there'd be nothing more than the kimono in this picture... so I shrank the distances to the doorways and the odd fan-thing above. Made it more interesting.
The walls are really a disgusting terracotta colour which I DETEST and cannot understand why everyone had to furnish their poor living rooms with, but there you are, and those living in said apartment, aren't really going to change it either. After all, painting walls is not half as fun as painting pictures, and it's a big bother too. No, causing your walls to have that terracotta colour is a lesser crime against humankind, I'd say. One it DOESN'T deserve.

The paper on which these were drawn was that old hate-friend of mine, an A4-sized one. The drawing pad is called "Teckning" which means "Drawing", and it's 40 pieces of paper, 140 grams heavy. Despite being a rather bleached white, it's supposed to be environmental friendly. My pencils are Derwent Graphic pencils, and, as you've guessed by now, I mostly use 2B. I started doing this after I read something about using that hardness for pre-watercolour drawings, and then heard John Howe (of Lord of the Rings drawing fame) say, during a highly amusing talk which I'm sad you miss out on but I cannot remember the url, that he'd recently upgraded from 2B to 4B. And I really like it. I also use a kneadable eraser, it's very useful, and of course an ordinary one as well. I am using a fairly small stompf, but it's much easier to get the control over smudges that I want, than with fingers alone.

I have, of course, drawn several more things. I might show them off, in particular, one or two profile drawings in pencil and with the Woody crayon. Also, I guess I should show you, how a table might look, after I'm done with a painting.

06 February 2011

First time with oils

This post will be updated and made better shortly. However, I thought it prudent to show to you my latest project. Edit: There, done.

The instructions were to paint an oil painting in impressionist style. Later, the instructions changed, to, "use your favourite Impressionist painter as inspiration", however by then, I had already done my painting and had no opportunities to do another one within the timeframe given.
I chose to use a photo I seem to return to again and again. It is taken of the MacLeod's stone on Isle of Harris, in the Hebrides, Scotland. There are many photos of that stone, but this particular one seems to speak of me not only of timelessness, eternity, but also that there could be something unseen there. I plan on painting it many times in the future.

Once again, it proves difficult to transfer the painting from painting, to photo, to blog. The first photo shows a somewhat less edited version, whereas the second is a wee bit more true to colour, I'd say. In both cases, the paint is barely dry, and I'll probably upload another picture once I get the chance.

This was my very first time with oil colours, and I must say it was a very very interesting, somewhat frightening and rather exhilarating experience. With the audiobook "Harry Potter and the Prizoner of Azkaban" in my ears (read by Jim Dale), I set to work, in an old shirt, with rags everywhere and a lot of misgivings. It did prove to be a new and exciting experience, though, and I look forward to trying it again. It is possible to go back and mess with colours that would, with acrylics and watercolours, have tried long, long ago, and blending is a lot easier, as is modifying small details. One can even remove a spot of paint completely!

Whether the painting really is impressionist, I'm a bit hesitant to say. I will do over once I get a better grasp of that particular style.
Here then, we have the mostly-dry version! In a different light, but still. I say "almost" because, as I noticed, the white wasn't dry yet. After a week and a half. I do like oils, and this new thing about them NOT drying is... an opportunity, I look forward to exploring.

22 January 2011

A self-portrait

So here we are - the very first post of this art-blog. It's kind of fitting, is it not, to start by posting the very first finished picture during its existence, too! To the right be a self-portrait in acrylics, on a 3F format panneau (or, canvas board), primed for oil colours, acrylic colours and gouache.

To begin, I chose a photo to use as reference - this was trickier than expected, but eventually, I decided on one randomly shot by a friend while riding a commuter train! This helped with the colours and lightning, but as one could probably predict, I chose to change the background somewhat...
Now, I've been painting a lot the past years, but mostly wargame miniatures, and the acrylics, techniques and subjects you use there range from "a little" to "somewhat" to "radically" different on the spectrum. It has, however, given me a lot better understanding of colours and painting, and I used that as well as I could.
With some help from the most excellent book "Color - A Course In Mastering The Art Of Mixing Colors" by Betty Edwards (which is dead tricky to get hold of, leading eventually to my borrowing of it as a .pdf) I believe I managed to take my painting up a notch.

Starting with big areas seemed like a good idea here, as well, and so I tried to figure out what underlying colour I should use for the face, before doing the same with the hair. After that, it was all about layering and highlights and shadows. The hair proved tricky indeed, but as the eyes accidentally became a wee bit larger than in the photo itself, they draw the most attention, and so I think I can stand the hair being a bit wonky.
Essentially, I worked in three phases - face, hair and details. The background was a stroke of randomness. I wanted some kind of texture, but nothing that detracted from the main subject of the painting. So some kind of tree-ish background would be all right, I thought, and keep it greyish (with different tones) to complement the eyes and be interesting enough, but not too much.
Sharp eyes will detect there being a wee bit of blue in the shadows, but there's some green too. If I was allowed to change only one thing I'd probably do something more about the eyebrows - I didn't paint in their areas with skin colour from the start, which I really ought to have done. I'm especially happy with stuff that disappears from taking a photo of it - all the smooth shadows and highlights, the details, the eyes and the lips, the teeth that aren't too white... Overall, yes, I am quite happy and satisfied with it. All wonkiness can be excused for now.

This portrait will probably not be for sale, but is still a good first picture for showing the versatility I am capable of.

/Ellie